Enabling Two-Factor Authentication for your Apple ID adds an extra layer of security. Along with your password, you’ll need to verify your identity, making it much harder for attackers to access your account, even if they have your password.
How two-factor authentication works on Apple devices
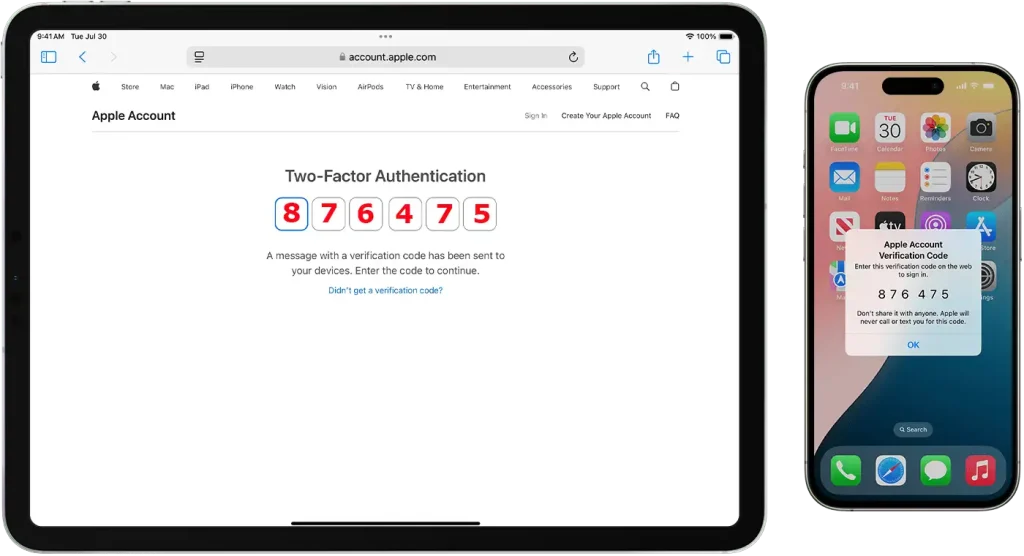
Logging into your Apple account is essential to using Apple services across your devices. While this enables a smooth experience across all devices, it also opens the door to risks—if someone gains access to your account, they could control everything linked to it. That’s why Apple requires two-factor authentication (2FA) for added security. Critical services like Apple Pay and “Sign in with Apple” won’t work without it.
There are two main ways to verify your identity:
- Trusted phone number: This is a phone number where you can receive verification codes via SMS. It’s wise to add a backup trusted number in case your iPhone is lost or damaged. Without this, you may struggle to access your account.
- Trusted device: Any Apple device linked to your account, such as an iPhone, iPad, Mac, Apple Watch, or Apple Vision Pro. These devices can receive verification codes through system alerts or push notifications.
The process is straightforward: a verification code is sent to your trusted device or phone number after entering your password on a new device. Once you enter the code correctly, the device is added to your trusted list, eliminating the need for future codes. Apple securely stores unique identifiers like serial numbers and iPhone EID numbers to recognize trusted devices.

Activating Two-Factor Authentication on Apple Devices
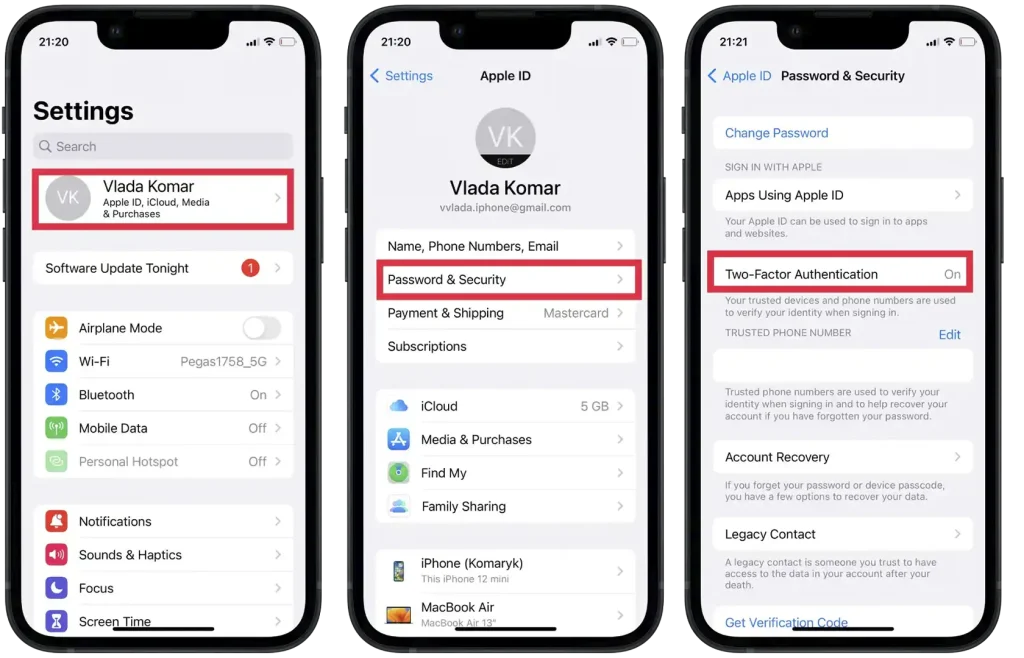
You can enable Two-Factor Authentication (2FA) on the Apple ID website, as well as on Mac, iPhone, and iPad. Since most users primarily interact with their phones, the following table provides a clear guide on how to set up 2FA across various Apple devices. Additionally, some screenshots of the iPhone configuration are included below for reference.
:
| Device | Steps to Enable Two-Factor Authentication |
|---|---|
| iPhone/iPad | 1. Open the Settings app. 2. Tap your name at the top. 3. Select Password & Security. 4. Tap Turn On Two-Factor Authentication. 5. Follow the on-screen instructions. |
| Mac | 1. Click the Apple menu and go to System Preferences. 2. Select Apple ID. 3. Click on Password & Security. 4. Click Turn On Two-Factor Authentication. 5. Follow the prompts to complete the setup. |
| Apple ID Website | 1. Go to the Apple ID account page. 2. Sign in with your Apple ID. 3. In the Security section, click Edit. 4. Click Turn On Two-Factor Authentication and follow the instructions. |

Add trusted devices and phone numbers for two-factor authentication in Apple
Adding Trusted Phone Numbers
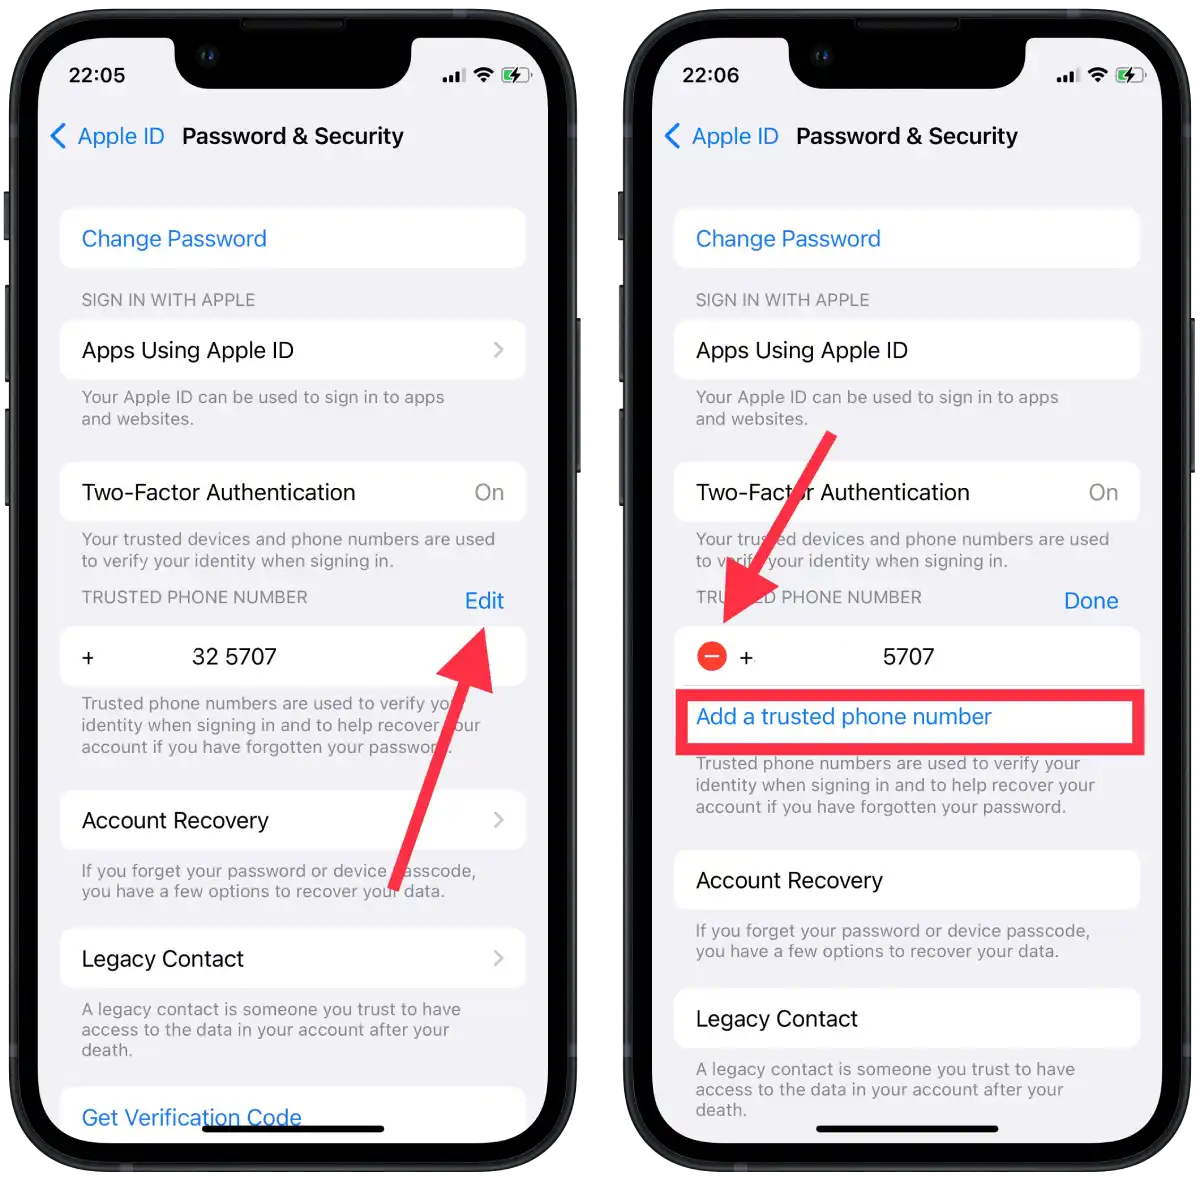
Adding a trusted phone number is a smart option, especially if you don’t own other Apple devices. While you can use your iPhone’s phone number as a trusted number, this presents challenges if your iPhone is lost or damaged. In such cases, you’d need to transfer the SIM card or eSIM to a new device, or, if your phone is lost, go through the process of recovering the phone number itself.
For added security and convenience, it’s a better idea to assign a trusted phone number to someone you know and trust. This way, you can quickly add a new device to your Apple ID without delay.
Below is a table that explains how to add a trusted number to your account:
| Device | Steps to Add a Trusted Phone Number for 2FA |
|---|---|
| iPhone/iPad | 1. Open the Settings app. 2. Tap your name at the top. 3. Select Password & Security. 4. Tap Edit next to Trusted Phone Numbers. 5. Tap Add a Trusted Phone Number. 6. Enter the phone number and choose to verify via SMS or phone call. 7. Enter the verification code sent to the new number. |
| Mac | 1. Open System Preferences and click on Apple ID. 2. Select Password & Security. 3. Click Edit next to Trusted Phone Numbers. 4. Click the + button to add a new phone number. 5. Enter the new number and select a verification method (SMS or call). 6. Enter the code sent to the new number to verify it. |
| Apple ID Website | 1. Visit the Apple ID account page. 2. Sign in with your Apple ID. 3. In the Security section, click Edit. 4. Click Add a Trusted Phone Number. 5. Enter the number and choose the verification method (SMS or call). 6. Enter the verification code sent to the new number. |
By assigning a trusted number to someone reliable, you ensure a quick and secure way to manage your Apple ID in case of unexpected issues with your primary device.

Adding Trusted Devices
Trusted devices are Apple devices (iPhone, iPad, Mac, etc.) that you’ve already signed in to with your Apple ID. Once signed in, these devices can receive verification codes to complete 2FA.
Steps to Add a Trusted Device:
- Sign in to your Apple ID on the device (iPhone, iPad, Mac, etc.).
- After signing in, the device is automatically added to your trusted devices list.
- In the future, this device will receive 2FA codes when you sign in on new devices or browsers.


