There’s nothing complicated on Chrome OS, so anyone who has used macOS or Windows in the past won’t have any problems with usage. But if we talk about screen orientation, Chromebooks work very similarly to Android devices.
Many users are looking for a simple way to rotate the screen on your Chrome OS, or they may accidentally click some random keys, and this causes your screen to swing out of order. You can follow two methods to rotate the screen on Chromebook. The first method is to rotate the screen using the built-in shortcut or change the “Settings” menu. Keep in mind that when you change the orientation of your Chromebook, the trackpad will follow the screen’s orientation.
How to rotate the Chromebook screen using the shortcut?
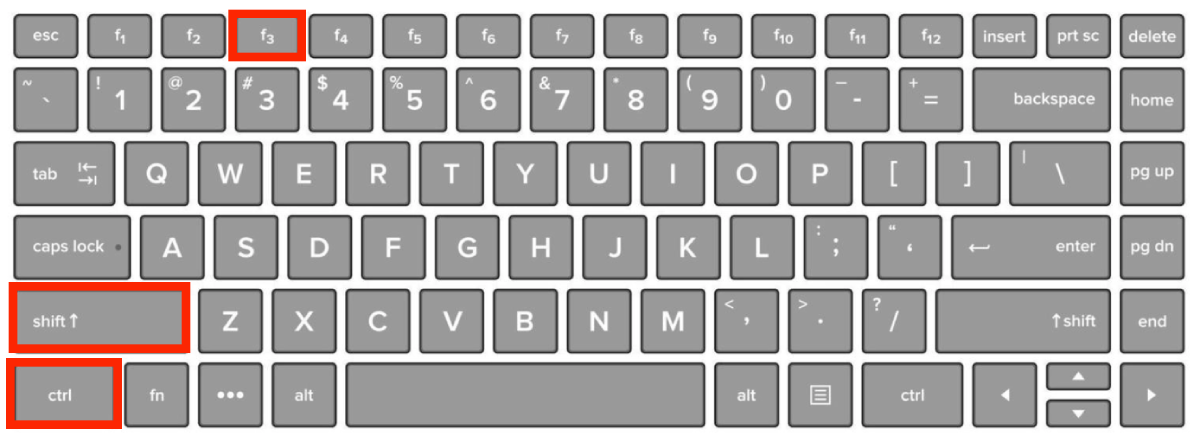
To rotate the Chromebook screen, you may press the Ctrl + Shift + Refresh (F3) to do the shortcut, as it would be the simplest way.

Upon pressing these buttons simultaneously, you will be prompted by a pop-up. When you tap on Continue, you will see that the screen has rotated 90 degrees. You will only see this prompt the first time you attempt to rotate your screen using this shortcut.
You should be aware of the drawback of this method. The screen will be only clockwise by 90 degrees. If you’re looking to finetune the orientation of your screen on Chromebook, move down to the next potential fix below.
If you use this shortcut, the custom screen orientation will be preserved even after you restart your Chromebook device (until you press the key combination again). To prevent this, you may use a 2-in-1 device with Auto-Rotation enabled.
This method will only work if the function key is enabled in the Chrome OS settings.
What to do to enable the function key?
So if you want to use the shortcut to rotate the screen on Chromebook, you need to first enable the function key function in your Chrome OS settings by following these steps:
- First of all, you should tap on the System Clock, which you may find in the bottom-right corner, then you should tap on the gear icon from the pop-up menu that would be displayed.
- After you have entered the settings menu, you should press on Device from the tab on the left.
- Then, you should head to the right-hand side tab to find and click on the Keyboard.
- There will be a range of options under the Keyboard. There, you should switch on the Treat top-row keys as function keys.
After these steps, you can use the shortcut to rotate the screen on Chromebook.
How to rotate the screen from Chromebook’s Settings?
This method will also allow you to rotate your Chrome OS’s screen. Using the Chromebook Settings menu, you can jump the screen orientation by 270 degrees without making a special effort.
To rotate your screen from Chromebook’Settings, you should follow the steps below:
- Click on the status area in the bottom right corner of the screen, where the time is displayed.
- Click on the settings (gear) icon to open the Chromebook’s settings.
- In the settings menu, click on “Device” or “Device settings.”
- Scroll down to the “Screen” section.
- Click on the “Screen orientation” dropdown menu.
- Select the desired screen orientation from the options: “Standard,” “Flipped,” or “Upside down.”
- Your screen will rotate to the selected orientation.
The screen rotation can be chosen manually: (0°), 90°, 180°, and 270°, but keep in mind that this menu will be inaccessible if you’re using a 2-in-1 Chromebook in Tablet Mode. In this case, you can make the menu accessible by disabling Auto-Rotation from the Chrome OS pop-up menu.
The option to rotate the screen may not be available on all Chromebook models. Additionally, some Chromebook models may have additional screen orientation options, such as portrait mode.
What are the Chromebook’s screen settings?
The screen settings on a Chromebook allow you to customize the display of your device’s screen. Here are some of the most common screen settings that you can adjust on a Chromebook:
Screen resolution
You can adjust the screen’s resolution to make text and images appear sharper or clearer. To change the screen resolution on a Chromebook, follow these steps:
- Click on the status area in the bottom right corner of the screen, where the time is displayed.
- Click on the settings (gear) icon to open the Chromebook’s settings.
- In the settings menu, click on “Device” or “Device settings.”
- Scroll down to the “Screen” section.
- Click on the “Screen resolution” dropdown menu.
- Select the desired screen resolution from the options.
Changing the screen resolution can affect the size and clarity of text, images, and other elements on your screen. You may need to adjust other screen settings, such as the display size, to ensure that the screen is easy to read and navigate.
Screen brightness
You can adjust the screen’s brightness to make it brighter or dimmer. You can adjust the screen’s brightness to make it brighter or dimmer. To change the screen brightness on a Chromebook, follow these steps:
- Click on the status area in the bottom right corner of the screen, where the time is displayed.
- Locate the brightness control icon, which looks like a sun with rays.
- Click and hold on to the brightness control icon and drag the slider left or right to adjust the brightness.
Night Light
You can turn on Night Light to reduce the amount of blue light emitted by the screen, which can help reduce eye strain and promote better sleep. To change the Night Light setting on a Chromebook, follow these steps:
- Click on the status area in the bottom right corner of the screen, where the time is displayed.
- Click on the settings (gear) icon to open the Chromebook’s settings.
- In the settings menu, click on “Device” or “Device settings.”
- Scroll down to the “Night Light” section.
- Turn on the Night Light toggle switch to enable the feature.
You can adjust the color temperature and schedule for Night Light to make the display more comfortable at night or in low-light environments.
Display mode
You can adjust the display mode of the screen to make it appear more natural or vivid. To change the display mode on a Chromebook, follow these steps:
- Click on the status area in the bottom right corner of the screen, where the time is displayed.
- Click on the settings (gear) icon to open the Chromebook’s settings.
- In the settings menu, click on “Device” or “Device settings.”
- Scroll down to the “Screen” section.
- Scroll down to the “Display mode” section.
- Click on the dropdown menu and select the desired display mode.
Display size
You can adjust the size of text, icons, and other elements on the screen to make them appear larger or smaller. To change the display size on a Chromebook, follow these steps:
- Click on the status area in the bottom right corner of the screen, where the time is displayed.
- Click on the settings (gear) icon to open the Chromebook’s settings.
- In the settings menu, click on “Device” or “Device settings.”
- Scroll down to the “Screen” section.
- Scroll down to the “Display size” section.
- Use the slider to adjust the display size.
These are some standard screen settings you can adjust on a Chromebook. The options available may vary depending on your specific model and device settings.


