Did you recently buy a new Dell Windows laptop to replace your old Mac and have your AirPods on hand? Don’t worry. AirPods support all Windows devices, just like Apple devices. Connecting AirPods to a Dell laptop is easy, and the process is the same as with any other Bluetooth headset. It should be noted that it is not as convenient as in the case of Apple devices because Windows is not part of the famous “Apple ecosystem.” However, I’ll show you how to connect AirPods to your Windows 10 or 11 and even make their microphone work together with sound.
How to add AirPods to a Dell laptop on Windows 11
If your Dell laptop has Windows 11 installed and there is an active Bluetooth adapter, then connecting your AirPods will be quite easy. Before setting up your AirPods, ensure your charging case is charged, and both AirPods are in the charging case. For this, you need the following:
- Click on the Start button on your Windows 11 taskbar and click on Settings (gear icon) to open the Windows 11 settings.
- Click “Bluetooth & Devices” in the left-hand pane of the Settings window.
- Make sure that the Bluetooth toggle is switched on. If it’s off, click on it to switch it on.
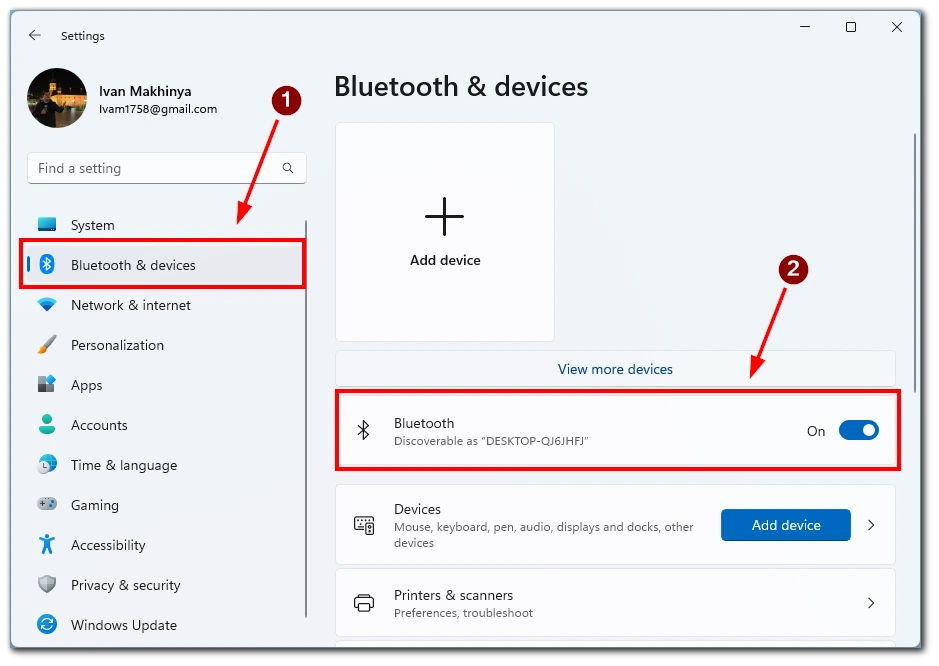
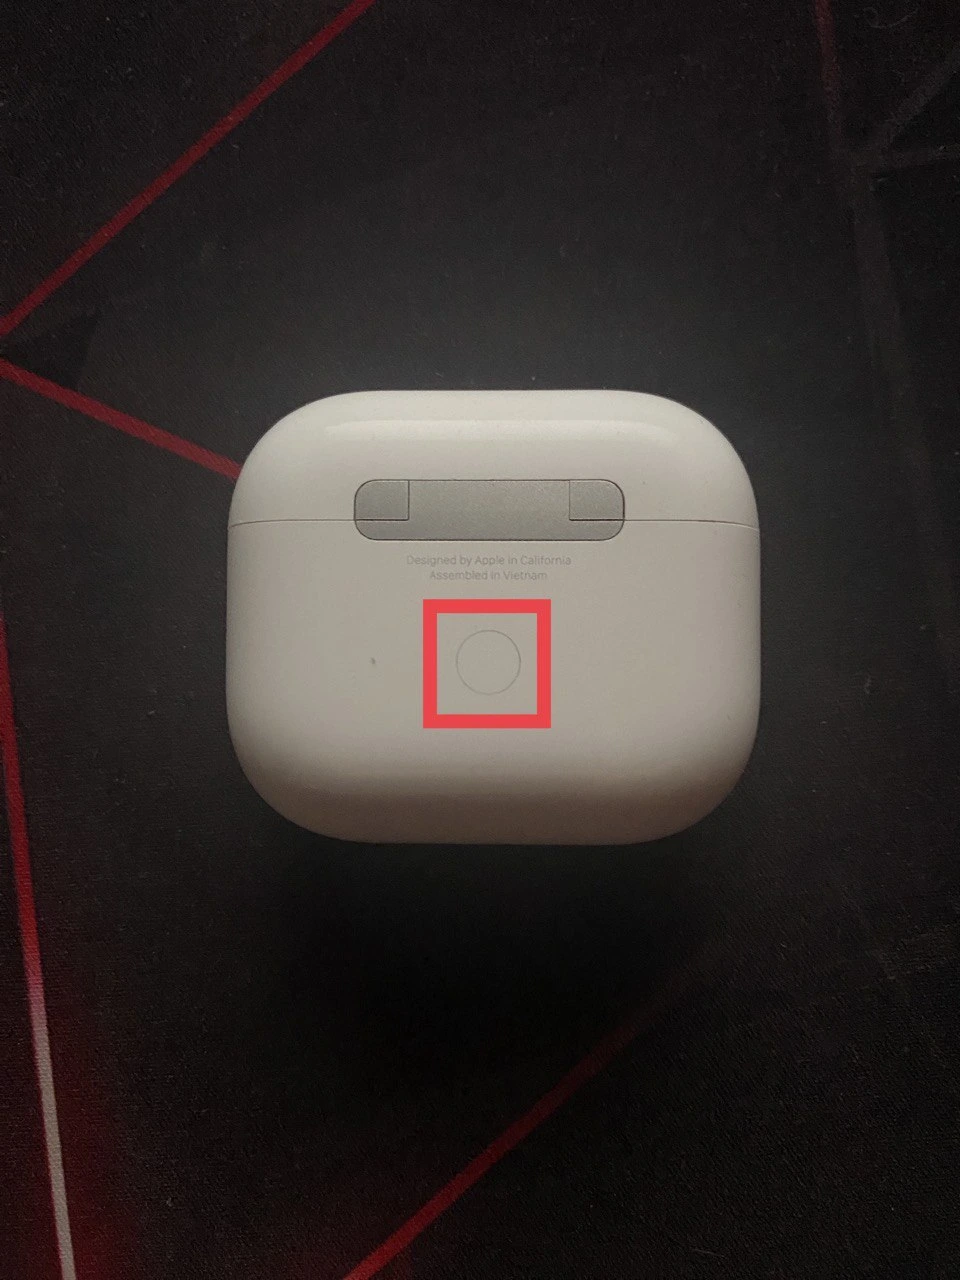
- Press and hold the small button on the back of the AirPods case until the LED light on the front of the case starts flashing white.
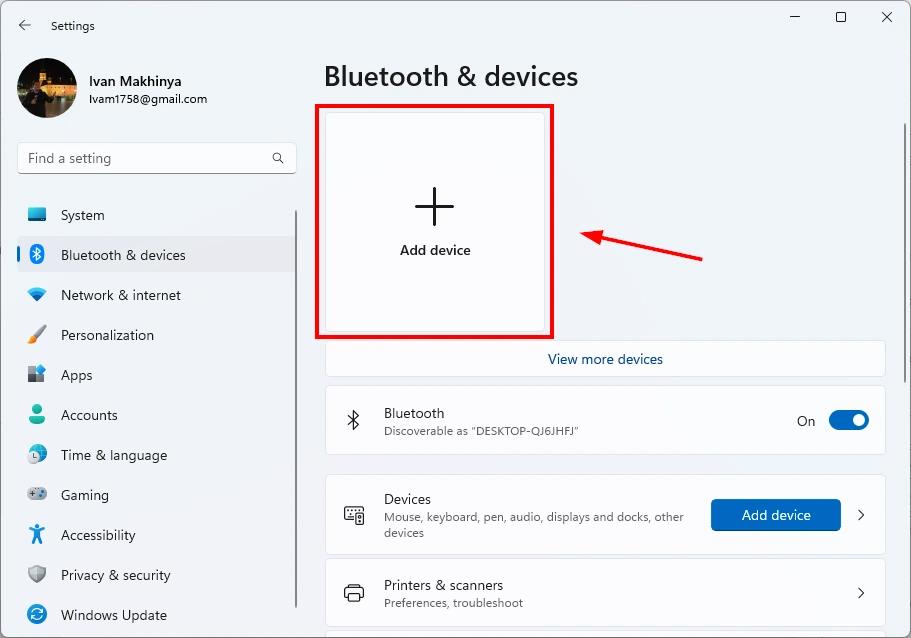
- Return to the “Bluetooth & devices” section of the Windows 11 Settings window.
- Click on “Add device.”
- In the “Add a device” window that appears, select “Bluetooth”.
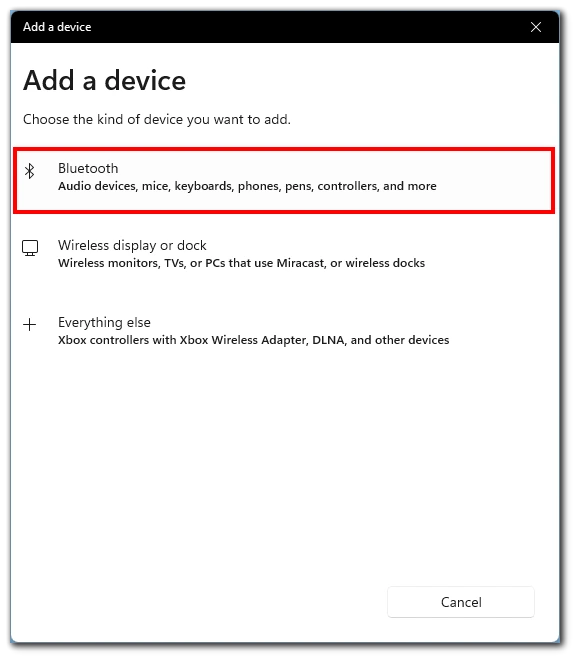
- Your Dell laptop will now search for available Bluetooth devices. Select your AirPods from the list of available devices.
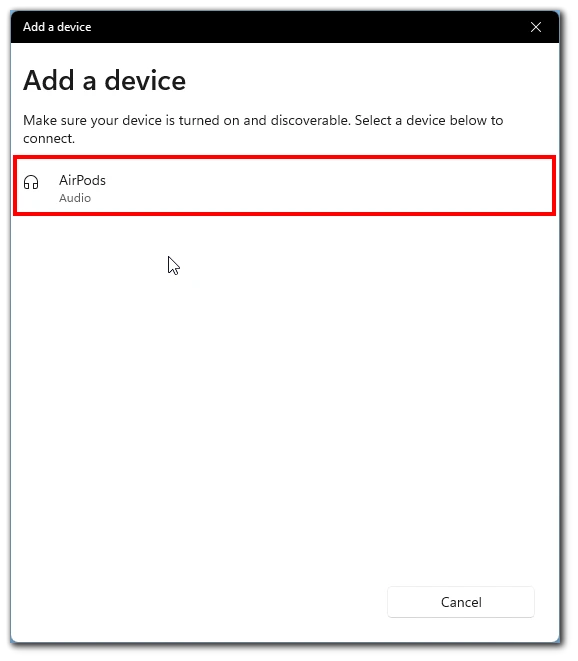
- Follow the on-screen instructions to complete the pairing process.
Once you have successfully connected your AirPods to your Dell laptop, you can test the connection by playing music or calling. Note that sometimes the sound input on your laptop may not switch automatically, in which case, click on the speaker icon on the bottom right of the taskbar and select your AirPods from the list.
How to add AirPods to a Dell laptop on Windows 10
If your Dell laptop has an older Windows 10, don’t worry, AirPods are supported by Windows 10. The steps will be very similar to the instructions for Windows 11. First, put both AirPods in a charging case and then follow these steps:
- Open the Settings app in Windows 10. To do this, you can press the Windows key + I simultaneously.
- Once the Settings app is open, navigate to the “Devices” option.
- Under the “Devices” option, ensure that Bluetooth is turned on. If it isn’t, toggle the switch to turn it on.
- Select “Add Bluetooth or other devices”.
- On the “Add a device” screen, select “Bluetooth” as the type of device to add.
- Take your AirPods out of the case and press the button on the back until the LED light starts flashing.
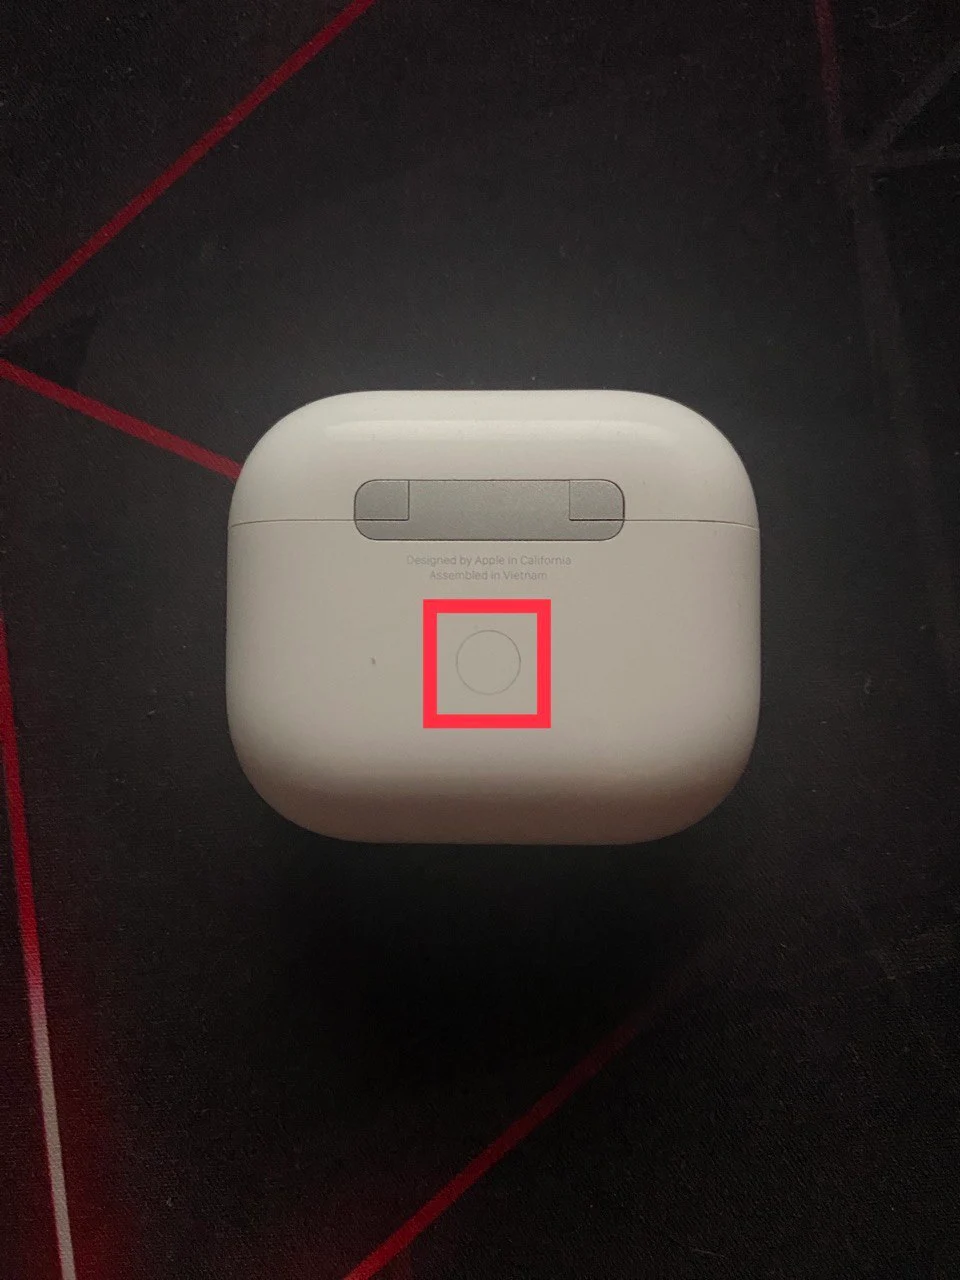
- Your Windows 10 PC will search for available devices. Once your AirPods appear on the list, select them to begin pairing. Wait for the pairing process to complete.
After pairing, your AirPods will appear as a connected devices on your Windows 10 PC. You’ll also receive a notification confirming your device is ready. Once your AirPods are paired and connected to your Windows 10 PC, you can enjoy wireless audio and hands-free calling.
How to turn on the microphone on AirPods connected to a Dell laptop
If you’re using AirPods with your Dell laptop and want to use the microphone feature, you may need to enable it manually. Many users find that the microphone does not automatically switch to AirPods when the earphones are connected to the laptop. To do this, you will need:
- Before turning on the microphone, ensure your AirPods are properly connected to your Dell laptop. Pair your AirPods by following the steps I outlined earlier.
- Once your AirPods are connected to your Dell laptop, access the sound settings. To do this, go to Settings, choose “System,” and “Sound” from the list.
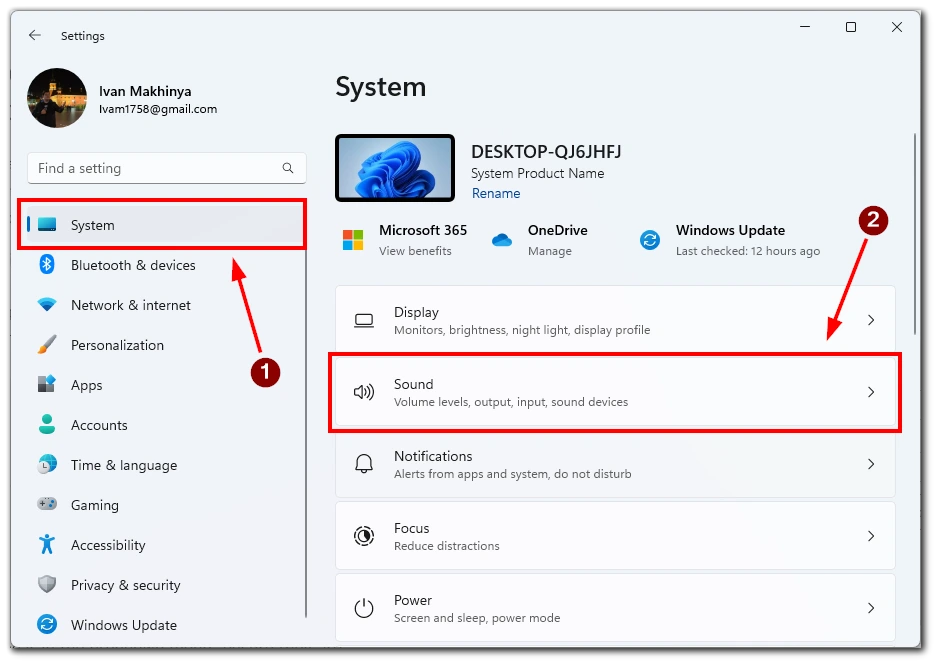
- In the Sound settings, locate the “Input” section and select your AirPods from the dropdown menu as the input device. If your AirPods don’t appear in the dropdown menu, ensure they are properly connected to your Dell laptop and try again.
- Once you have selected your AirPods as the input device, you can test the microphone by speaking into them. You should see the sound meter respond to your voice. If it doesn’t, ensure your AirPods are properly connected and selected as the input device.
- If the microphone volume is too low, you can adjust the sound settings by moving the microphone volume slider at the bottom.
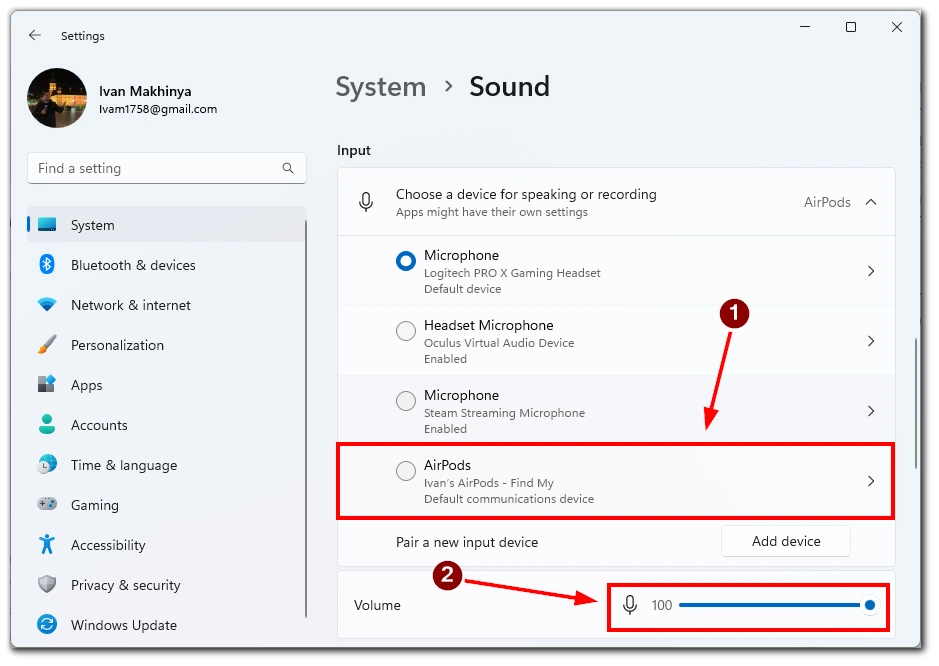
Once you have enabled the microphone and adjusted the settings, you can use your AirPods for calls or recordings. Select your AirPods as the input device in any application you want to use them with.
In conclusion, enabling the microphone on AirPods connected to a Dell laptop is simple. Just follow these steps to select your AirPods as the input device and adjust the microphone settings to start using your AirPods for calls or recordings on your Dell laptop.
Troubleshooting problems when connecting AirPods to a Dell laptop
Connecting AirPods to a Dell laptop is a convenient way to enjoy wireless audio without cords. However, there are instances when connecting AirPods to a Dell laptop can be problematic. In this guide, we will discuss some of the most common issues you may encounter when connecting AirPods to a Dell laptop and how to troubleshoot them.
AirPods won’t connect to a Dell laptop
If your AirPods won’t connect to your Dell laptop, ensure your laptop is compatible with Bluetooth and has Bluetooth turned on. If your laptop does not have Bluetooth, you may need to purchase a Bluetooth adapter. If your Dell laptop and AirPods still won’t connect, try resetting them by following these steps:
- Put your AirPods in the charging case and close the lid.
- Hold the button on the back of the case for at least 15 seconds until the LED flashes amber.
- Put your AirPods close to your Dell laptop and try connecting them again.
However, you should be aware that this will reset your AirPods. You may need to reconnect them to all the devices you previously connected.
Poor audio quality
If you experience poor audio quality when using your AirPods with your Dell laptop, try the following:
- Move your laptop closer to your AirPods. Bluetooth has a limited range, so the audio quality may deteriorate if you move too far away.
- Remove any other Bluetooth devices that may be interfering with the connection.
- Make sure your AirPods are fully charged. Low battery life can cause audio issues.
- Clean your AirPods to remove any debris that may be blocking the sound.
Note also that the problem may be without the latest drivers. In this case, you need to connect AirPods to any device with an internet connection and wait a few minutes. They should automatically update their firmware.
AirPods disconnecting frequently
If your AirPods keep disconnecting from your Dell laptop, try the following:
- Make sure your AirPods are fully charged.
- Remove any other Bluetooth devices that may be interfering with the connection.
- Move your laptop closer to your AirPods.
- Reset your AirPods by putting them in the charging case and holding the button on the back until the LED light flashes amber.
- Update your Dell laptop’s Bluetooth drivers.
AirPods not showing up as a device
If your AirPods are not showing up as a device on your Dell laptop, try the following:
- Ensure your AirPods are in pairing mode by pressing and holding the button on the back of the case until the LED light flashes white.
- Move your AirPods closer to your Dell laptop.
- Restart your Dell laptop and try again.
- Reset your AirPods by putting them in the charging case and holding the button on the back until the LED light flashes amber.
In conclusion, connecting AirPods to a Dell laptop can sometimes be problematic, but these troubleshooting steps can help you resolve most issues. Following these steps, you can enjoy wireless audio from your AirPods without any connectivity issues.


