Safe Mode is a vital troubleshooting tool that allows users to diagnose and resolve various issues on their Windows 11 systems. Whether dealing with a persistent software problem or suspecting a driver conflict, booting into Safe Mode can help isolate and resolve these issues. You can do this in several different ways.
How to boot in safe mode on Windows 11 using Start Menu
Windows 11 offers a convenient method to access Safe Mode directly from the Start menu. This user-friendly approach eliminates the need for external tools or complex command-line options. For this, you will need the following:
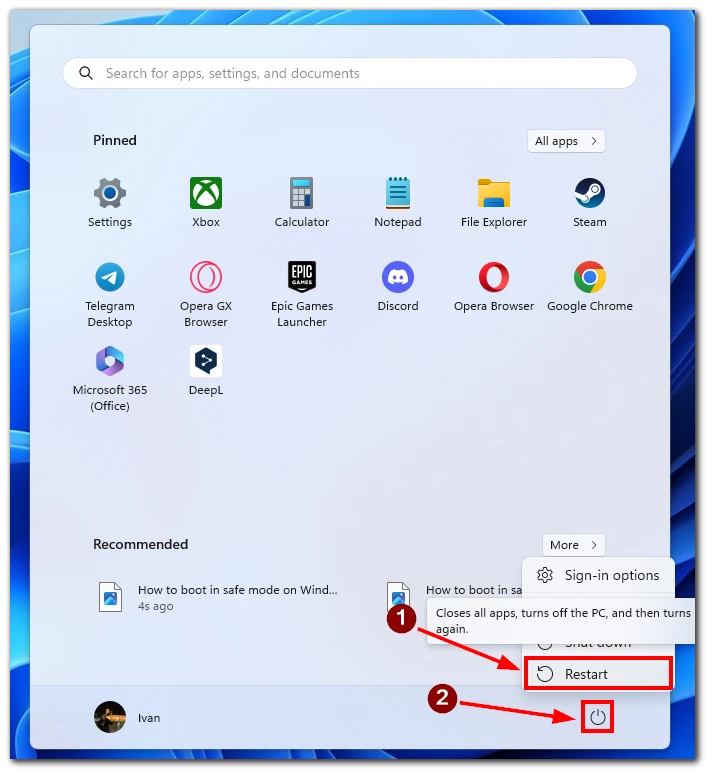
- To begin, click the Start button in the taskbar. You can also press the Windows key on your keyboard to open the Start menu.

- Once the Start menu is open, locate and click on the Power icon. It is usually represented by a power symbol and is positioned above the Start button.
- When you click on the Power icon, a menu will appear. Press and hold the Shift key on your keyboard, then click the Restart option. This action will initiate a restart of your Windows 11 system.
- After the system restarts, it will boot into the Windows Recovery Environment. Here, you will be presented with various troubleshooting options. Click on the Troubleshoot option to proceed.
- Within the Troubleshoot menu, locate and click on the Advanced options. This will lead you to a new set of advanced recovery options.
- Within the Advanced options, you will find an option labeled “Startup Settings.” Click on this option to access the Startup Settings menu.
- You will see a list of available startup options in the Startup Settings menu. To boot into Safe Mode, locate and click the “Restart” button.
- After your system restarts, you will have a list of startup options. Press the corresponding number key (usually 4 or F4) on your keyboard to select the “Enable Safe Mode” option. Alternatively, you can use the function keys F5 or number 5 to enable Safe Mode with Networking, allowing internet connectivity in Safe Mode.
Once you have selected the desired Safe Mode option, your system will start booting into Safe Mode. You will notice that the desktop environment appears different, with a minimal set of drivers and services loaded.
How to boot in safe mode on Windows 11 using the command prompt
While the command-line approach may appear more advanced, it provides a direct and efficient way to access Safe Mode for troubleshooting purposes. Besides, it’s actually quite easy to do:
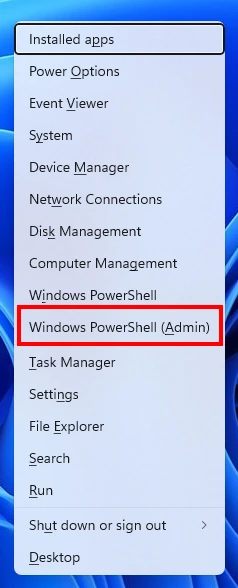
- To begin, press the Windows key + X on your keyboard to open the Power User menu.
- From the menu options, select “Windows PowerShell (Admin)” or “Command Prompt (Admin)” to open an elevated command prompt window.
- In the command prompt window, type the following command and press Enter:
shutdown.exe /r /o
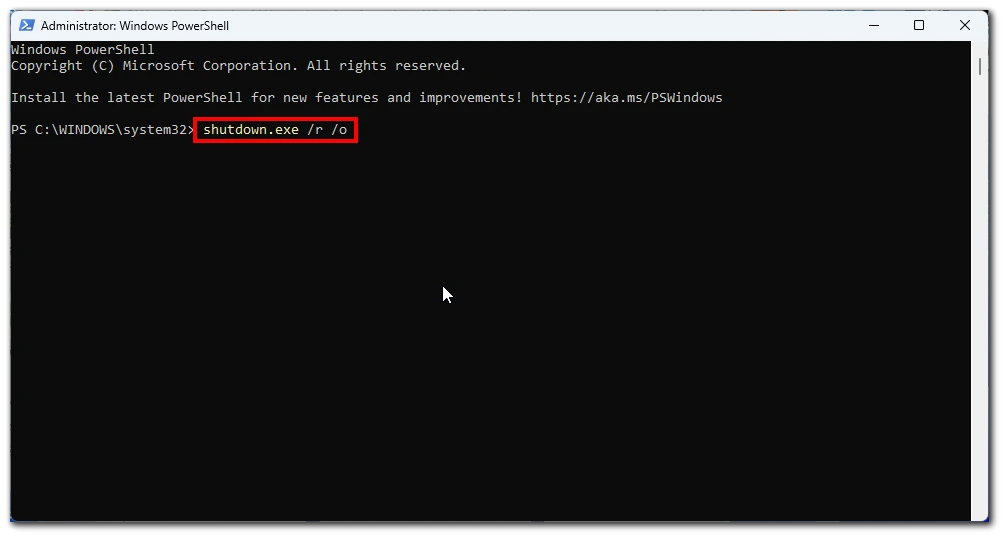
- After executing the command, your Windows 11 system will restart and enter the Advanced Boot Options screen. Choose Troubleshoot > Advanced > Startup Settings. Here, you will see a list of available startup options.
- There are different variations of Safe Mode available, such as “Safe Mode,” “Safe Mode with Networking,” or “Safe Mode with Command Prompt.” Click on the Restart button.
- After the restart, choose the appropriate option based on your specific needs.
To exit Safe Mode and return to normal boot, restart your computer. You can do this by pressing the Windows key + X, selecting “Shut down or sign out,” and clicking “Restart.”
How to boot in safe mode on Windows 11 using settings
Windows 11 provides users various methods to access Safe Mode, a diagnostic startup mode designed to troubleshoot software, driver conflicts, and other system-related issues. One such method involves utilizing the Settings app, offering a user-friendly approach to entering Safe Mode:
- To begin, from the Start menu, locate and click on the “Settings” icon, which resembles a gear.
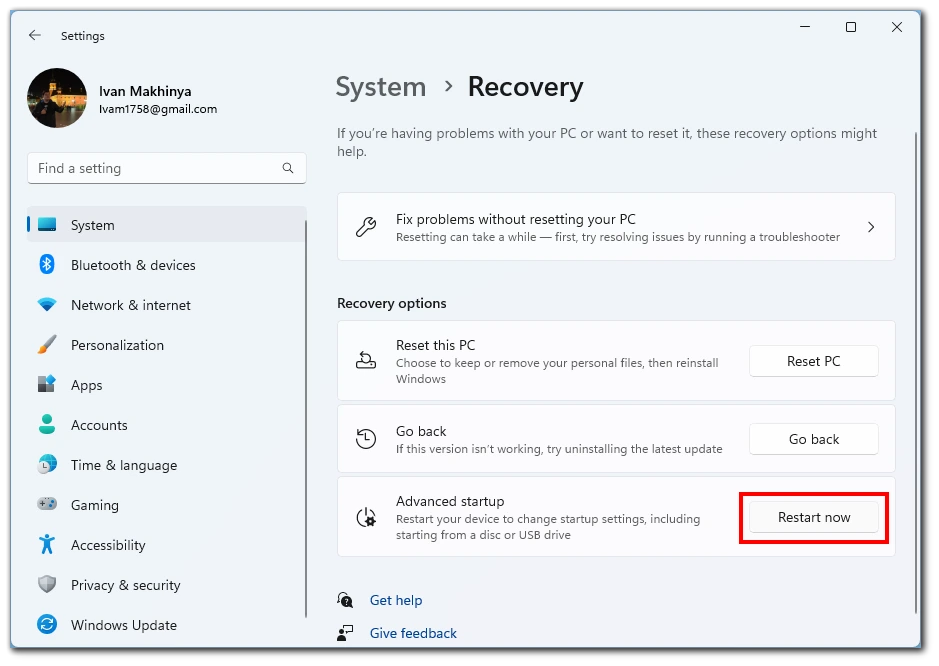
- Within the Settings app, click on the “System” category to access the system-related settings. In the right-hand menu, select the “Recovery” option.
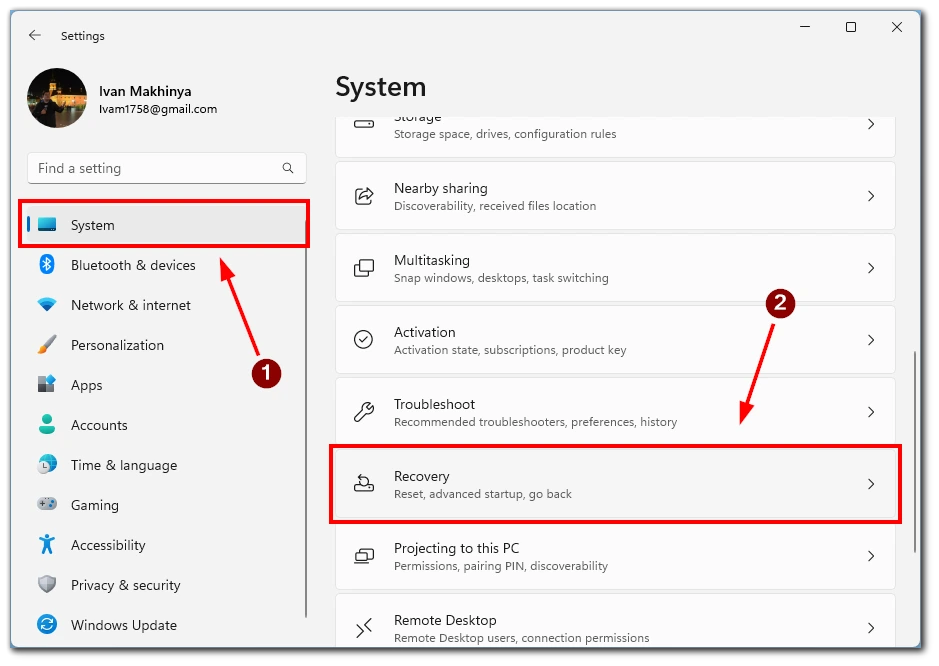
- Under the Recovery settings, you will find an option labeled “Advanced startup.” Click on the “Restart now” button located under this section. Windows 11 will now initiate a restart to enter the advanced startup environment.
- After the system restarts, you will receive a blue screen titled “Choose an option.” From the available options, click on “Troubleshoot.”
- In the Troubleshoot menu, locate and click the “Advanced options” button. This will provide you with further advanced recovery options to choose from.
- In the Advanced options menu, locate and click the “Startup Settings” option. This will lead you to the Startup Settings screen.
- On the Startup Settings screen, click the “Restart” button to reboot your system again. Upon restart, you will be presented with a list of startup options.
- You will see a list of available startup options in the Startup Settings menu. To boot into Safe Mode, locate and press the corresponding function key (usually F4 or the number 4). This will select the “Enable Safe Mode” option. Alternatively, you can use function key F5 or the number 5 to enable Safe Mode with Networking, allowing internet connectivity in Safe Mode.
After selecting the desired Safe Mode option, your Windows 11 system will start booting into Safe Mode. You will notice that only essential drivers and services are loaded, creating a minimal and stable environment for troubleshooting purposes.
How to boot in safe mode on Windows 11 using the power button
Booting into Safe Mode on Windows 11 using the physical power button on your computer is not a direct option. Safe Mode is typically accessed through software-based methods. However, you can still initiate a restart and access the advanced boot options by following these steps:
- Save your work and close all open programs. It’s important to save any unsaved work and close all open applications before proceeding. Press and hold the physical power button on your computer. Locate the physical power button on your computer case or laptop and press and hold it for a few seconds. This action will force your system to shut down.
- Wait for a few seconds, and then press the power button again. After shutting down your computer, wait a few seconds to ensure a complete power-off state.
- Then, press the power button again to turn on your computer. Repeat this 2 and 3 two more times. To access the advanced boot options, you must repeat steps 2 and 3 twice. This process involves shutting down and restarting your computer three times.
- On the third restart, Windows 11 will enter the advanced boot options. After the third restart, Windows 11 will detect the consecutive power-off events and automatically enter the advanced boot options. Here, you will find various troubleshooting options, including Safe Mode.
- Use the arrow keys to navigate and select Safe Mode. Once in the advanced boot options, use the arrow keys on your keyboard to navigate and select the Safe Mode option. Press Enter to confirm your selection.
Note: This method may vary slightly depending on your computer’s manufacturer and configuration. If the above steps do not work, refer to your computer’s user manual or contact the manufacturer for specific instructions on accessing the advanced boot options.
When do you need to boot in safe mode on Windows 11?
Booting in Safe Mode on Windows 11 is useful in various scenarios when encountering system issues. Safe Mode allows you to start Windows with minimal drivers and services, providing a clean and stable environment for troubleshooting and resolving problems. Here are some common situations where booting into Safe Mode is beneficial:
- Troubleshooting Software Issues: If you are experiencing software-related problems, such as frequent crashes, unresponsive applications, or unexpected errors, Safe Mode can help isolate the issue. By loading only essential drivers and services, Safe Mode eliminates potential conflicts caused by third-party software or problematic system configurations. This lets you determine if the issue stems from software conflicts, helping you troubleshoot and potentially uninstall or update problematic applications.
- Diagnosing Driver Conflicts: Incompatible or outdated device drivers can cause system instability and crashes. Windows starts in Safe Mode and uses minimal drivers necessary for basic functionality. By booting into Safe Mode, you can identify if a driver conflict is causing issues. If your system operates smoothly in Safe Mode, you may need to update or reinstall problematic drivers to resolve the conflicts.
- Removing Malware and Viruses: Safe Mode is an effective way to tackle malware and virus infections. Some malicious software may interfere with normal boot processes, making it difficult to remove them. By booting into Safe Mode, you limit the number of running processes and prevent certain types of malware from loading. This makes it easier to run antivirus scans or use malware removal tools to detect and remove malicious software from your system.
- Fixing System-Related Problems: If you encounter system-wide issues, such as blue screen errors, startup loops, or settings that prevent normal booting, Safe Mode can help you resolve these problems. By loading a minimal set of drivers and services, Safe Mode allows you to access critical system components and make necessary repairs or adjustments. You can use Safe Mode to troubleshoot system files, restore system settings, or perform system recovery options.
- Accessing Advanced Troubleshooting Tools: Safe Mode provides access to advanced troubleshooting tools and options unavailable in normal boot mode. Once in Safe Mode, you can use tools like the command prompt, system restore, event viewer, and device manager to diagnose and fix various system issues. These tools can help identify the root cause of problems and facilitate resolution.
Booting into Safe Mode on Windows 11 is beneficial in various situations. Whether you need to troubleshoot software conflicts, diagnose driver issues, remove malware, or fix system-related problems, Safe Mode provides a controlled environment to identify and resolve these issues effectively. It is a valuable tool for any Windows user when encountering problems that require a clean and stable operating environment for troubleshooting and resolution.


