When you sign in to Windows 11 with a Microsoft account, the operating system forces you to use a password or PIN. Some users find this reasonably annoying. After all, if no one else has access to their PC, why should they always have to enter their password?
If you agree, you should know that you can easily enable automatic login in Windows 11. It’s worth noting that you can replace messy passwords with more straightforward and more secure biometric authentication. If your device has a Windows Hello-compatible webcam or fingerprint scanner, you can sign in to Windows 11 using facial recognition or fingerprint.
Well, here’s how it all works.
How to enable automatic login without password in Windows 11
Before you turn on auto-login without a password in Windows 11, you need to disable Windows Hello. After that, you need to force the OS to use your account information to auto-login. The latter can be done using a classic control panel applet or a registry tweak.
So let’s move step-by-step.
Disable Windows Hello
To turn off Windows Hello, you can follow these steps:
- Press Win + I to open Settings and go to Accounts.
- After that, scroll down and select the Sign-in options.

- Then disable the first option under Additional settings.
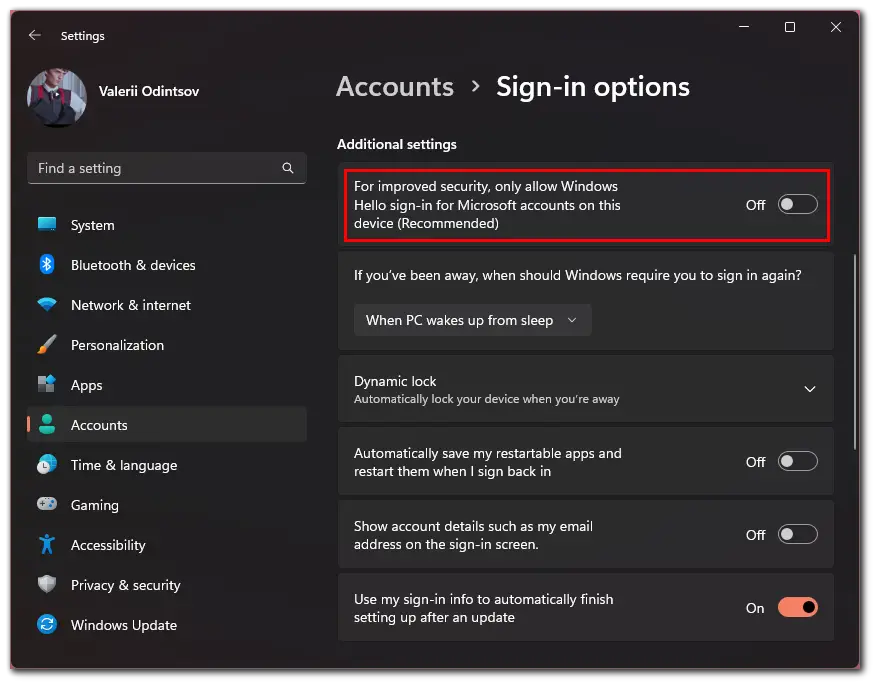
- Select Never from the “If you’ve been away, when should Windows require you to sign in again?” drop-down list.
- Now, re-enter this settings section.
- Click on the PIN (Windows Hello) tab and select Remove.
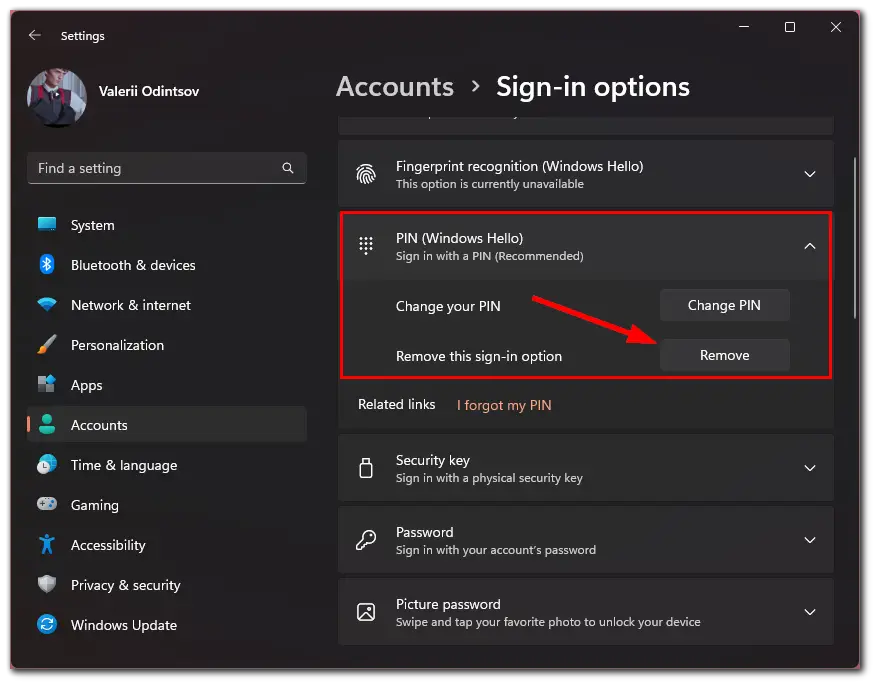
- Confirm by clicking Remove again and entering the password from your Microsoft account.
Once you have disabled Windows Hello, you can move to the next chapter and learn how to prevent Windows 11 from asking for a password after it boots.
Turn on automatic sign-in
To disable automatic sign-in, follow these instructions:
- Press Win + R, enter netplwiz, and click OK.

- After that, in the window that appears, select your account and uncheck Users must enter a user name and password to use this computer.
- Then click Apply.
- Now you need to enter your credentials. For a local account, Windows will automatically fill in the User Name field, and all you have to do is enter your password.
- For a Microsoft account, enter your email.
- Enter your password and confirm it in the appropriate field.
- Finally, click OK.
Once you have completed these steps, restart your Windows 11 PC, and you will automatically log in to the selected user account without entering your PIN manually.
Sometimes the “Users must enter a user name and password to use this computer” option is missing.
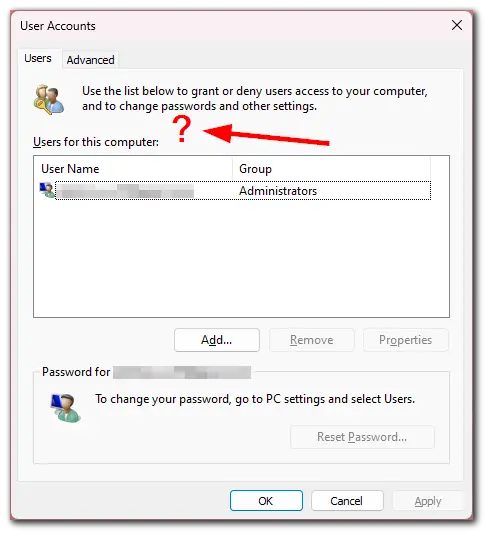
In this case, do the following to fix it:
- Press Win + R and enter regedit.
- Then in the Registry Editor window, navigate to the following location using the left panel:
- Computer\HKEY_LOCAL_MACHINE\SOFTWARE\Microsoft\Windows NT\CurrentVersion\PasswordLess\Device
- Double-click the DWORD DevicePasswordLessBuildViersion on the right side of the key or Device folder to edit it.
- After that, change the Value data field to 0 and click OK. Its value is 2 by default.
Finally, repeat the steps above when opening the User Accounts window.
Read Also:
- How to fix Driver Power State Failure error in Windows 11
- How to use clipboard history on Windows 11
- How to test your microphone on Windows 11
How to automatically sign in to Windows 11 using Computer Management
You can also use the Computer Management tool to log in to your Windows 11 user account automatically. To do so, follow these steps:
- Press Win + R and type in compmgmt.msc. Press Enter.
- Now, expand Local Users and Groups, and select Users in the left pane.

- After that, right-click on your username and select Set Password…
- This procedure will reset your PC’s current Windows password and other passwords and may cause permanent data loss.
- Then click Proceed.
- Finally, do NOT enter a password in the following dialog box. Just click OK.
Once you have completed these steps, reboot your PC, and you will see that there’s already no password. That’s it. You can now sign in to Windows 11 automatically.


